
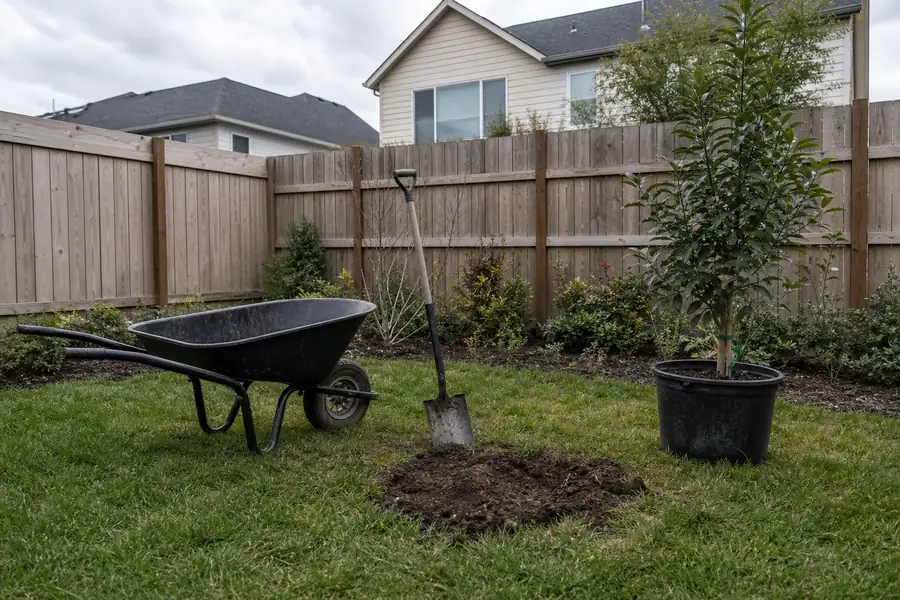
The short version: dig a hole two to three times wider than the root ball and no deeper than it, find the root flare and set it level with the surrounding soil or slightly above, backfill with the soil you dug out, water it in, and mulch 2-3 inches deep without touching the trunk. Most trees that fail do not fail at the hole. They fail in the twelve months afterwards, from the wrong amount of water at the wrong interval - and how long that period lasts depends on your hardiness zone as much as on the tree.
Key takeaways
- Depth is measured from the root flare, not the top of the root ball. Nursery stock frequently arrives with the flare buried. If you use the soil line in the pot as your reference, you may be planting several inches too deep.
- Width matters more than depth. The hole is wide and shallow, not deep and narrow.
- Do not amend the backfill. Use the soil you dug out.
- Do not fertilize at planting. The International Society of Arboriculture is explicit: "Avoid fertilizing at the time of planting."
- Water by the formula, not the calendar. 2-3 gallons per inch of trunk diameter, each time you water.
- Establishment takes roughly 3 months per inch of caliper in zone 10 and 12 months per inch in zone 4. Same tree, four times the commitment.
Before you dig: three checks that take ten minutes
Call 811 first
In the United States, calling 811 schedules a free locate of buried public utility lines. It is free, it is usually required, and striking a gas or fiber line while planting a $400 tree is an expensive way to learn the rule. Do this before anything else.
Look up, then look sideways
Find the mature spread of the tree you are planting and check it against what is overhead and beside it. A tree that will reach 40 feet wide is a different object from the 7-foot stick in your driveway today, and overhead conductors do not move. If there are power lines above the spot, choose a species that tops out below them rather than planning to prune forever - our guide to choosing trees for planting under power lines covers the clearance question in detail, and how far from the house to plant a tree covers the rest of the siting decision.
Test the drainage
This is the check almost nobody does, and it predicts failure better than anything else on this list. Dig a hole about 12 inches deep, fill it with water, let it drain, then fill it again and measure how far the water level drops per hour.
| Drop per hour | What it means | What to do |
|---|---|---|
| More than 3 inches | Fast-draining, likely sandy | Plant normally; expect to water more often |
| 1-3 inches | Desirable for most trees | Plant normally |
| Less than 1 inch | Poor drainage | Plant high, or build a mound. See planting trees in clay soil |
| Still standing after 24 hours | The site will drown most species | Choose a wet-tolerant species or move the location |
Drainage thresholds per University of Kentucky Cooperative Extension.
If the site fails this test, that is not a reason to give up - it is a reason to plant differently. Bald Cypress, Pond Cypress and River Birch tolerate wet feet that would kill a Japanese Maple.
What you need
- A round-point shovel and a spade or tarp for the soil you remove
- A tape measure or a straight piece of timber to lay across the hole
- A utility knife or hand pruners for container stock, bolt cutters for a wire basket
- 2-3 inches of coarse wood-chip or bark mulch, enough for a ring at least 3 feet across
- Water, and a way to deliver it slowly
- A hand truck or a second person for anything above about 15 gallons. Root balls are heavier than they look - a 24-inch ball can run well over 200 pounds
Step 1 - Find the root flare
The root flare is the point where the trunk stops being a cylinder and widens into the topmost structural roots. It is the single reference point for everything that follows, and it is not always where the nursery soil line is.
Scrape the surface soil away from the trunk with your fingers or a hand tool until you find where the first big root leaves the trunk. In container stock this is sometimes two or three inches below the potting-mix surface; in balled-and-burlapped stock it can be deeper still.
ISA's instruction is direct: "Ensure trunk flare is partially visible after the tree is planted. Remove excess soil prior to planting if flare is not visible."
Why it matters: a buried flare is the beginning of stem-girdling roots, which Colorado State University Extension calls "the most common cause of tree decline and death in the landscape" - and which typically appear "some twelve to twenty plus years after planting." You will not see the consequence of this mistake for two decades. That is exactly why it is worth five minutes now.
Done right: you can see the trunk visibly widen at the base, and you know how many inches of soil sit above it inside the ball.
Full detail in what the root flare is and how to find it.
Step 2 - Measure the root ball, then dig wide and shallow
Measure from the root flare to the bottom of the root ball. That measurement is your hole depth - not an inch more.
Dig the hole two to three times the width of the root ball and no deeper than the measurement you just took. Both ISA and UF/IFAS specify the same geometry. On a 16-inch root ball, that is a hole roughly 32-48 inches across.
Slope the sides outward rather than digging a straight-walled pit, and rough up the walls with your shovel. In clay, a smooth-walled hole behaves like a container and roots will circle inside it.
The reason for the shape: roots grow outward, not downward. Colorado State puts about 50% of a tree's absorbing roots in the top 12 inches in good soil, and 90-95% in the top 12 inches in compacted or clay soil. You are preparing a wide, shallow zone because that is where the tree is going to live.
Common mistake: digging deep and backfilling loose soil underneath the ball. That soil settles, the tree sinks, the flare ends up buried, and you have created the problem in Step 1 after correctly avoiding it. Always set the root ball on undisturbed soil.
Done right: lay a shovel handle across the hole. The root flare sits level with it or a touch above.
Step 3 - Prepare the roots
What you do here depends on how the tree arrived.
| Stock type | What to do | What to avoid |
|---|---|---|
| Container | Slide the pot off. Shave the outer inch or so off the sides of the root ball with a sharp spade, or at minimum cut any root that circles the trunk | Leaving circling roots intact "to avoid damage". They will girdle the trunk |
| Balled-and-burlapped | Set it in the hole first, then cut away all twine, fold down or remove the burlap from the top third, and remove the wire basket or cut the top one or two rings off | Leaving twine around the trunk. It girdles fast |
| Bare root | Spread the roots over a cone of firm soil in the center of the hole | Letting roots dry out at any point. See how to plant bare root trees |
UF/IFAS is specific about container stock: "Shave off the outer inch or so of the root ball with a sharp shovel. This removes roots that could strangle the trunk later as it grows in diameter." It feels violent the first time. Do it anyway.
Lift the tree by the root ball, not by the trunk (ISA). Lifting by the trunk tears the fine roots away from the ball you are trying to preserve.
Step 4 - Set the tree and check it from two angles
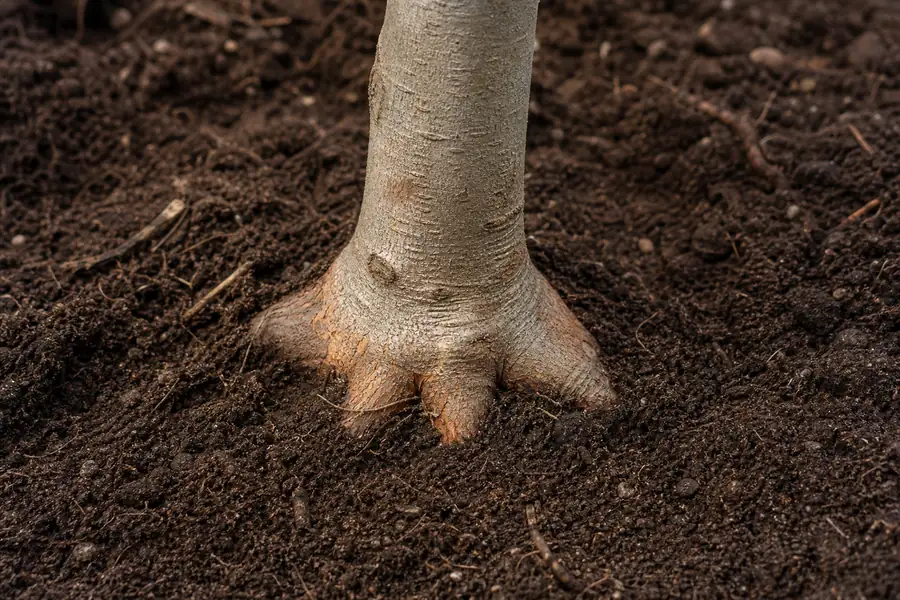
Place the tree in the center of the hole. Before you backfill anything, check two things:
- Height. Flare level with surrounding grade, or slightly above. UF/IFAS: "should be even with, or slightly above, the soil surface." If drainage was poor in your percolation test, deliberately plant high - up to a third of the root ball above grade on genuinely wet sites, per the South Carolina Forestry Commission.
- Plumb. Step back and look from two directions ninety degrees apart. A tree that looks straight from the driveway is often leaning when viewed from the kitchen window. Correct it now; it is much harder once backfilled.
Also decide which face of the tree points at the house. You are choosing the view for the next thirty years in about four seconds, so take the four seconds.
Step 5 - Backfill with the soil you dug out
Use the native soil. Do not amend it with compost, peat, topsoil or potting mix.
This is counterintuitive and it is the advice that most contradicts what people expect. The reason: a pocket of rich, light soil surrounded by heavy native soil behaves like an underground pot. Water moves differently across the boundary, and roots are reluctant to leave the comfortable material and push into the real soil. The tree stays container-bound in the ground.
Backfill in layers. UF/IFAS recommends slicing a shovel down into the soil twenty to thirty times around the tree as you fill, to break up air pockets, and ISA adds watering periodically while backfilling for the same reason. Firm with your foot - firm, not compacted.
Do not fertilize. ISA: "Avoid fertilizing at the time of planting." A newly planted tree is not short of nutrients; it is short of roots. Nitrogen pushes top growth that the surviving roots cannot support. If you want to know whether your soil is genuinely deficient, get a soil test from your county Extension office and act on it in year two. More in the best soil for planting trees.
Step 6 - Water it in properly
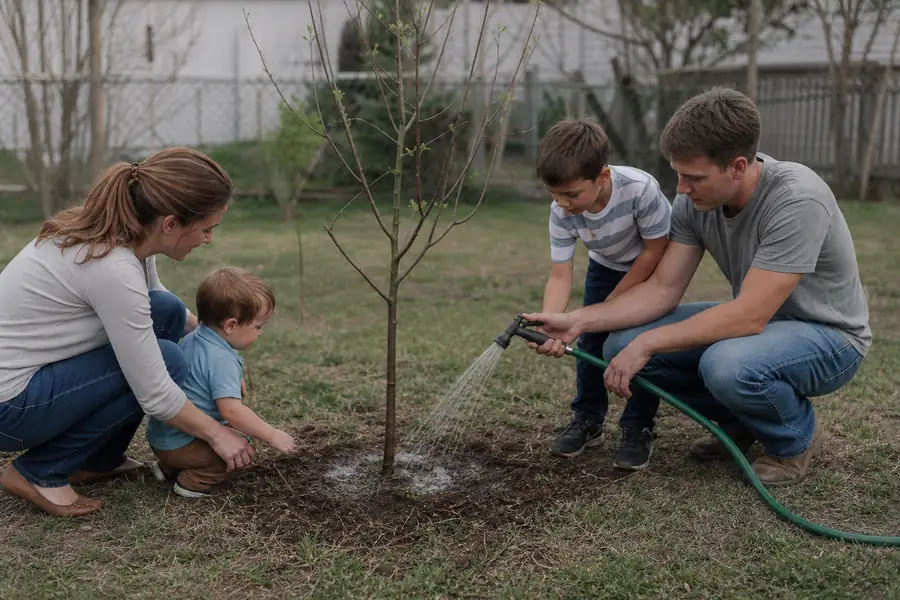
The first watering is not a sprinkle. It is how you settle the soil around the roots and remove the remaining air pockets.
Apply 2-3 gallons per inch of trunk diameter, measured at the trunk six inches above the flare (UF/IFAS). A 2-inch caliper tree gets 4-6 gallons. Deliver it slowly, over the root ball itself and the backfilled area, and let it soak rather than run off.
Build a low soil berm around the edge of the planting hole to hold water over the root zone if the site is at all sloped. Remove it after the first season.
Step 7 - Mulch, and keep it off the trunk
Spread 2-3 inches of mulch over the planting area - ISA's figure; UF/IFAS says 3 inches over a minimum 8-foot-diameter circle.
Leave a gap at the trunk. Here the sources genuinely differ: ISA specifies a mulch-free area of 1-2 inches wide at the base, UF/IFAS recommends 12 inches. Both are current and authoritative. The functional minimum is ISA's - enough that mulch is not sitting against bark, because constantly moist bark decays. The wider gap does two additional useful things: it keeps the flare visible so you can see if the tree is settling, and it gives voles less cover.
Never pile mulch against the trunk. The "mulch volcano" is the most common and most damaging landscape mistake in America. Full detail in how to mulch around a tree.
Step 8 - Stake only if you need to
Most trees should not be staked. ISA: "Studies have shown that trees develop stronger trunks and roots if they are not staked." A trunk that moves in the wind builds reaction wood and taper. A rigidly staked trunk does not.
Stake when the tree genuinely cannot hold itself up: bare-root stock, exposed and windy sites, or a top-heavy canopy on a small root ball. If you do, use three stakes, tie wide and flexible material low on the trunk, allow movement, and remove everything within one year (ISA and UF/IFAS agree on the deadline). See how to stake a tree.
Step 9 - Do not prune, with three exceptions
Resist the urge to "balance" the canopy against the lost roots. That advice is obsolete. The tree needs its leaves to rebuild roots.
Remove only: dead wood, broken branches, and any branch that is actively rubbing another. Structural pruning for a dominant leader starts in the next growing season, not today.
The first year is the part that actually matters
Everything above takes an afternoon. What follows determines whether the tree lives.
How much, how often
Water 2-3 gallons per inch of trunk diameter every time, and vary the frequency, not the volume:
| Period after planting | Spring or summer planting | What you are checking |
|---|---|---|
| First 2 weeks | Every 2-3 days | That the root ball itself is moist, not just the backfill |
| Weeks 3-12 | 2-3 times per week | Same |
| After the first few months | Weekly | Soil 4-6 inches down, by hand |
| Rain | Counts, if it is heavy enough to wet the root ball | Dig and check rather than assume |
UF/IFAS specifies 2-3 irrigations per week for the first few months on spring and summer plantings, then weekly until established. ISA's baseline is at least weekly, more in hot or windy weather.
Never water a saturated root ball. Overwatering and underwatering produce similar-looking wilting, and the only way to tell them apart is to put your finger in the soil. Full method in how to water a newly planted tree.
How long "establishment" lasts - and why your zone changes the answer
This is where most planting guides stop and simply say "the first year or two." It is not that simple, and the difference is large enough to matter.
| Your USDA zone | Establishment time per inch of trunk caliper | A 2-inch tree takes roughly |
|---|---|---|
| 10-11 | ~3 months | 6 months |
| 8-9 | ~4 months | 8 months |
| 6-8 | ~8 months | 16 months |
| 2-5 | ~12 months | 2 years |
Figures from Dr Edward Gilman's work at UF/IFAS. Watson's widely used general rule - at most one year per inch of caliper - sits at the conservative end of the same range.
The mechanism is simple: establishment means regrowing a root system, root growth is driven by soil temperature, and warm regions have far more root-growing days per year. A 2-inch Live Oak in zone 9 is on its own in well under a year. The same tree in zone 5 needs roughly two years of attention before you can stop thinking about it.
If you do not know your zone, the ZIP code tool will tell you, and it uses the current USDA Plant Hardiness Zone Map (2023 edition) - worth checking even if you think you know, because the 2023 revision shifted large parts of the country.
Why so much care is needed at all
Because of what happened to the roots before the tree reached you. When a field-grown tree is dug, more than 95% of its absorbing roots are severed (South Carolina Forestry Commission). A 1-inch caliper tree has a root system about 4.5 feet across and leaves the nursery with a root ball about 1.5 feet across. The tree in your yard is running a full-size canopy on a fraction of its plumbing.
That gap is transplant shock, and it is also why a smaller tree often overtakes a larger one planted at the same time.
What a successful first year looks like
| Timeframe | Normal | Worth investigating |
|---|---|---|
| Week 1-2 | Some leaf wilt in heat; slight leaf drop on deciduous stock | Full defoliation, or leaves crisping brown at the edges |
| Month 1-2 | Leaves hold; little or no new growth | Leaves yellowing from the inside out - usually overwatering |
| Month 3-6 | Small flush of new shoot growth, often modest | No new growth at all plus brittle twigs |
| Autumn year 1 | Normal color and leaf drop for the species | Leaves browning but hanging on through winter on a deciduous tree |
| Spring year 2 | Visible new growth, usually stronger than year 1 | Buds failing to break by 3-4 weeks after local bud-break |
A simple field test for whether a tree is alive: scratch a thin sliver of bark from a small twig with your thumbnail. Green underneath means living tissue. Brown and dry means that twig is dead - work your way down the branch to find where the green starts.
The six mistakes that kill new trees
- Planting too deep. The most common and the most fatal. Caused by using the pot soil line instead of the root flare. Fix: if you catch it within the first season, lift the tree and re-set it higher.
- Mulch against the trunk. Keeps bark wet, invites decay and rodents. Fix: pull it back today; it takes two minutes.
- Amending the backfill. Creates an underground pot. Fix: on a recently planted tree, little can be done but water consistently; the roots will eventually cross the boundary.
- Leaving circling roots. They become girdling roots and strangle the trunk a decade later. Fix: at planting only. This is a one-chance decision.
- Watering a little, often, from a sprinkler. Wets the backfill, misses the root ball. Fix: slow delivery, measured volume, directly over the ball.
- Leaving stakes on for years. Produces a weak, untapered trunk that snaps when the stakes finally come off. Fix: diary the removal date on planting day.
When to call a professional
Planting a 7-gallon Japanese Maple is a weekend job. Some situations are not:
- Any tree whose root ball you cannot comfortably move. Freight-delivered trees in the 2-inch-caliper range and up need equipment and usually two or three people.
- Overhead conductors anywhere near the work. Do not plant, prune or maneuver a tree near energized lines. Call the utility.
- Slopes steep enough that the root ball could move. See planting a tree on a slope.
- Sites that failed the drainage test badly and where you want a species that is not wet-tolerant. A consulting arborist or landscape contractor can assess whether drainage can be engineered.
FAQ
How deep should a tree be planted?
No deeper than the distance from the root flare to the bottom of the root ball, with the flare level with the surrounding soil or slightly above it. The depth of the pot is not a reliable guide - nursery stock is often potted or balled with soil over the flare, so measure from the flare itself. On poorly drained sites, plant deliberately high. Full method in how deep to plant a tree.
Should I put anything in the bottom of the hole?
No. No gravel, no compost, no fertilizer, no bone meal. Gravel in the base of a planting hole does not improve drainage - it creates a perched water table that holds water at the root ball. Set the root ball on firm, undisturbed soil.
How much water does a newly planted tree need?
2-3 gallons per inch of trunk diameter at every watering, per UF/IFAS. Frequency starts at every 2-3 days for the first couple of weeks, moves to 2-3 times a week for the first few months on spring and summer plantings, then weekly until the tree is established.
When is the best time of year to plant?
It depends on where you live more than most guides admit. Fall planting works well across the Southeast and much of the West. In the upper Midwest, Michigan State Extension recommends spring absent a compelling reason, because soil temperature drops below the 40°F threshold for root growth before the tree can establish. Full regional breakdown in when to plant a tree.
Do I need to stake my new tree?
Usually not. Stake only if the tree cannot stand on its own - bare-root stock, an exposed windy site, or a top-heavy canopy. If you stake, remove everything within one year.
Should I prune the top to compensate for lost roots?
No. That guidance was standard decades ago and has been abandoned. The tree regrows roots using energy produced by its leaves, so removing leaves slows establishment. Prune only damaged or dead wood at planting.
How long until I can stop worrying about it?
Between six months and two years depending on your zone and the tree's caliper - see the table above. Even after establishment, a tree benefits from deep watering in drought for its first three years.
Planting a tree matched to your zone removes the largest single variable in whether it survives. Enter your ZIP in the zone finder to see what thrives where you live, and every tree we ship is covered by our 1-Year Thrive Guarantee.